Christmas Day was this past Sunday. As usual I spent it with my aunt, uncle, cousin and her husband. Her husband's twin brother joined us this year as well as my uncle's brother and his wife. It was a great occasion and we all had lots of fun and ate our fill of great food. I mentioned in an earlier post that we tried a dry brine on our Thanksgiving turkey but the recipe needed a little tweaking. We made a few adjustments and WOW! This was one of our best turkeys ever. We've already done a wet brine method on the blog before. A wet brine is when the turkey (or any piece of meat you use) is immersed in a salty solution for a period of time. A dry brine is when the meat is rubbed with a mixture of salt, sugar and other spices and left for a period of time. This curing method produces a juicier, more tender and flavourful turkey. Given turkey's bad reputation for easily turning dry, I always recommend brining your turkey before roasting it.
So which is better: the dry brine or the wet brine? Either works great. You're likely to get a marginally crispier skin with the dry brine and a marginally juicier meat with the wet brine. A pro I can say about the wet brine is that its liquid state allows you to add a wider variety of flavours. A pro I can say about the dry brine is that it's less messy and cumbersome. If you ever have the opportunity to cook a turkey in a smoker, dry is definitely the best option. So a few things to consider there. Overall the end results of either method are similar.
In this method we actually used more sugar than salt, unlike our wet brine version. I was hesitant at first because I wasn't feeling the thought of candied turkey, but this was delicious. It doesn't have an oversweetened flavour at all. It was fantastic. We used brown sugar as well to enrich the flavour. Be sure to give this a try on your next turkey.
Ingredients
1 13-15 lb turkey
3 cups brown sugar *
1.5 cups kosher salt *
2 tbsp dried sage *
2 tbsp dried thyme *
2 tbsp dried savoury *
1/2 tsp ground allspice *
4 tbsp butter, room temperature
Herbs/spices of your choosing for turkey
Lemon, garlic, fresh herbs of your choosing for the cavity
Rinse the turkey thoroughly in cold water and pat dry, paying attention to every nook, cranny and the inside of the cavity. Then place in a roasting pan with at least 2" sides. Combine all of the ingredients with a * and generously rub the turkey inside, outside and all over. Try to get an even coating as possible. You could even try this in a plastic bag. Cover and refrigerate or keep in a cooler for 24 hours.
Afterward your turkey should look something like the picture below. An extracted pool of liquid will appear on the bottom.
Rinse the turkey very thoroughly in cold water. The turkey has already been well seasoned in the curing process. You need to rinse all that excess salt and sugar off. No corner cutting here. When your turkey is squeaky clean, dry it off with paper towel.
The next step is to fold the wings behind the shoulders like so. This will allow it to sit flat as it roasts in the oven.
Then season with any herbs and spices you like, omitting salt and sugar. We used ground black pepper, poultry seasoning, ground thyme, ground sage, ground oregano, paprika and cayenne. We made a bread and sausage stuffing with the turkey but we cook it separately. Stuffing a brined turkey is not recommended as it will come out overseasoned. We filled the cavity with fresh lemon, garlic, parsley, rosemary, thyme and sage. Use whatever you like. Dot the turkey with 4 tbsp of butter in a dozen places or so. Disclaimer: This pic was shot a little premature and only shows 2.

Cover the turkey and roast at 450 F/230 C for 10 minutes then reduce the heat to 325 F/163 C. The initial high heat will help to sear the outside of the bird. The rest of the cooking time depends on the weight of your turkey. At 325 F the rule of thumb is 20 minutes per lb. After the first 90 minutes of roasting, baste the turkey and continue to do so every 45-60 minutes until it's done to disperse the juices. Leave the turkey uncovered for the last hour of cooking.
We usually cheat and use premade gravy from a wholesome source. If you want to make your own gravy with this turkey recipe you certainly can. Just carefully skim most of the fat out of the drippings (leaving about 4 tbsp behind for flavour). Place the roasting pan on the stove over medium-high heat and whisk in 1/4 cup of flour in stages until completely incorporated. Cook for about 30 seconds then add 2-3 cups of chicken (or turkey) stock and 1/4 cup of white wine (optional). Whisk constantly until the gravy thickens to the desired consistency. While whisking, scrape up all the little brown bits from the bottom of the pan. Season to taste with salt and pepper before serving with the turkey.
As you can see, we ended up with a fabulous turkey with crispy, golden skin and meat so moist and tender it falls off the bone. Good luck keeping it intact while removing it from your roasting pan. Every time we have brined a turkey it has partially fallen apart while lifting it because it's so tender. No complaints.
Here's a shot of the complete Christmas dinner this year. Roasted turkey, bread and sausage stuffing, mashed potatoes with peas, steamed broccoli, turkey gravy and homemade cranberry sauce. You better believe I finished it all. lol
Brining makes the best turkeys! We agreed that this was one of our best turkeys yet. One of the best parts about roast turkey dinners are the leftovers afterward! Nothing beats a good ol' leftover turkey sandwich but I like to get creative now and then. Here is a spicy ramen I made with the turkey, wood ear mushroom, spinach and a poached egg. It was delicious! A nice spin on turkey soup. Which reminds me, don't forget to save your turkey bones for homemade stock!
Be sure to give this dry brine a try for your next turkey dinner. I hope you enjoyed this and are feeling inspired. It makes such a difference.
I hope everybody had a wonderful holiday season and happy new year!
B

We had a pot luck lunch at the office today to celebrate the holiday season. My contribution was homemade skillet cornbread. It's a very easy recipe so I figured I'd show you guys how to do it. Cornbread is a cornerstone in cuisine of the Southern States. Its origins date back to the ancient native people of the Americas. They were cultivating and eating corn and ground cornmeal for thousands of years before European colonialism appeared. Cornbread is rustic, ancient and goes with just about anything. I think it goes particularly well with chili, chicken or cooked greens. It does not contain yeast so you don't need to worry about kneading the dough or waiting for it to rise. It has baking powder and baking soda as the leavening agents. It has more of a cake texture than a bread texture and the cornmeal gives it a particular crumbly toothsomeness. It's rich and a little sweet. This recipe uses jalapeño, cheddar, scallions and corn kernels as well which add flavours, colour and a variety of textures. What makes cornbread corn bread is the use of cornmeal. Adding kernels of actual corn is not traditional but it's tasty and adds a nice sweetness to compliment the mild heat of the jalapeño. I've seen some recipes that add creamed corn too. Feel free to follow whatever your wee heart desires.
More on this recipe's versatility, this version includes the addition of sugar. From my understanding the adding or omitting of sugar is based on regional preference. There are some who wouldn't dare add sugar to cornbread. I find the added sweetness works well in this version because it has some spice but, again, feel free to omit it or include it as you wish.
The best way to cook cornbread is in a piping hot cast iron skillet. That's how you get a beautiful, golden crust on the bottom and the sides. I just seasoned my cast iron on the weekend so it was the perfect opportunity to put it in action. I love my cast iron cookware. If you take care of them properly they'll last long after you do. Its often passed down through a generation or two (or three). It's perfect for staying very hot and keeping an even heat distribution. That way you get a great sear or crust on whatever you cook in it. In this recipe we're going to preheat the skillet in the oven to ensure the perfect crust on the cornbread. If you don't have a cast iron skillet you can omit that step and use a baking dish. You won't get an epic crust that way but it will still be good.
Ingredients
1 1/4 cups ground cornmeal
3/4 cup all-purpose flour
1/4 cup granulated sugar (optional)
1 tsp salt
1/4 tsp cayenne pepper (optional)
2 tsp baking powder
1/2 tsp baking soda
1 cup grated cheddar
1 large jalapeño, seeded and finely diced
2 scallions, finely chopped
1/2 cup of frozen corn (optional)
1 cup buttermilk
1/3 cup 2% (or whole) milk
2 eggs, beaten
8 tbsp butter (1 stick)
Preheat oven to 425 F/218 C and place a cast iron skillet on the middle rack to heat up while you make the batter.
In a large bowl combine the cornmeal, flour, sugar, salt, baking powder, baking soda and cayenne and whisk to incorporate.
In a separate bowl, combine the eggs, milk and buttermilk. Meanwhile, melt most of the butter reserving a tbsp or so for the skillet later. Let the melted butter cool a bit so that it doesn't cook the eggs.
Whisk the egg, buttermilk and milk mixture into the dry ingredients.
Whisk in the slightly cooled, melted butter.
Mix in the grated cheddar, jalapeño, scallions and corn.
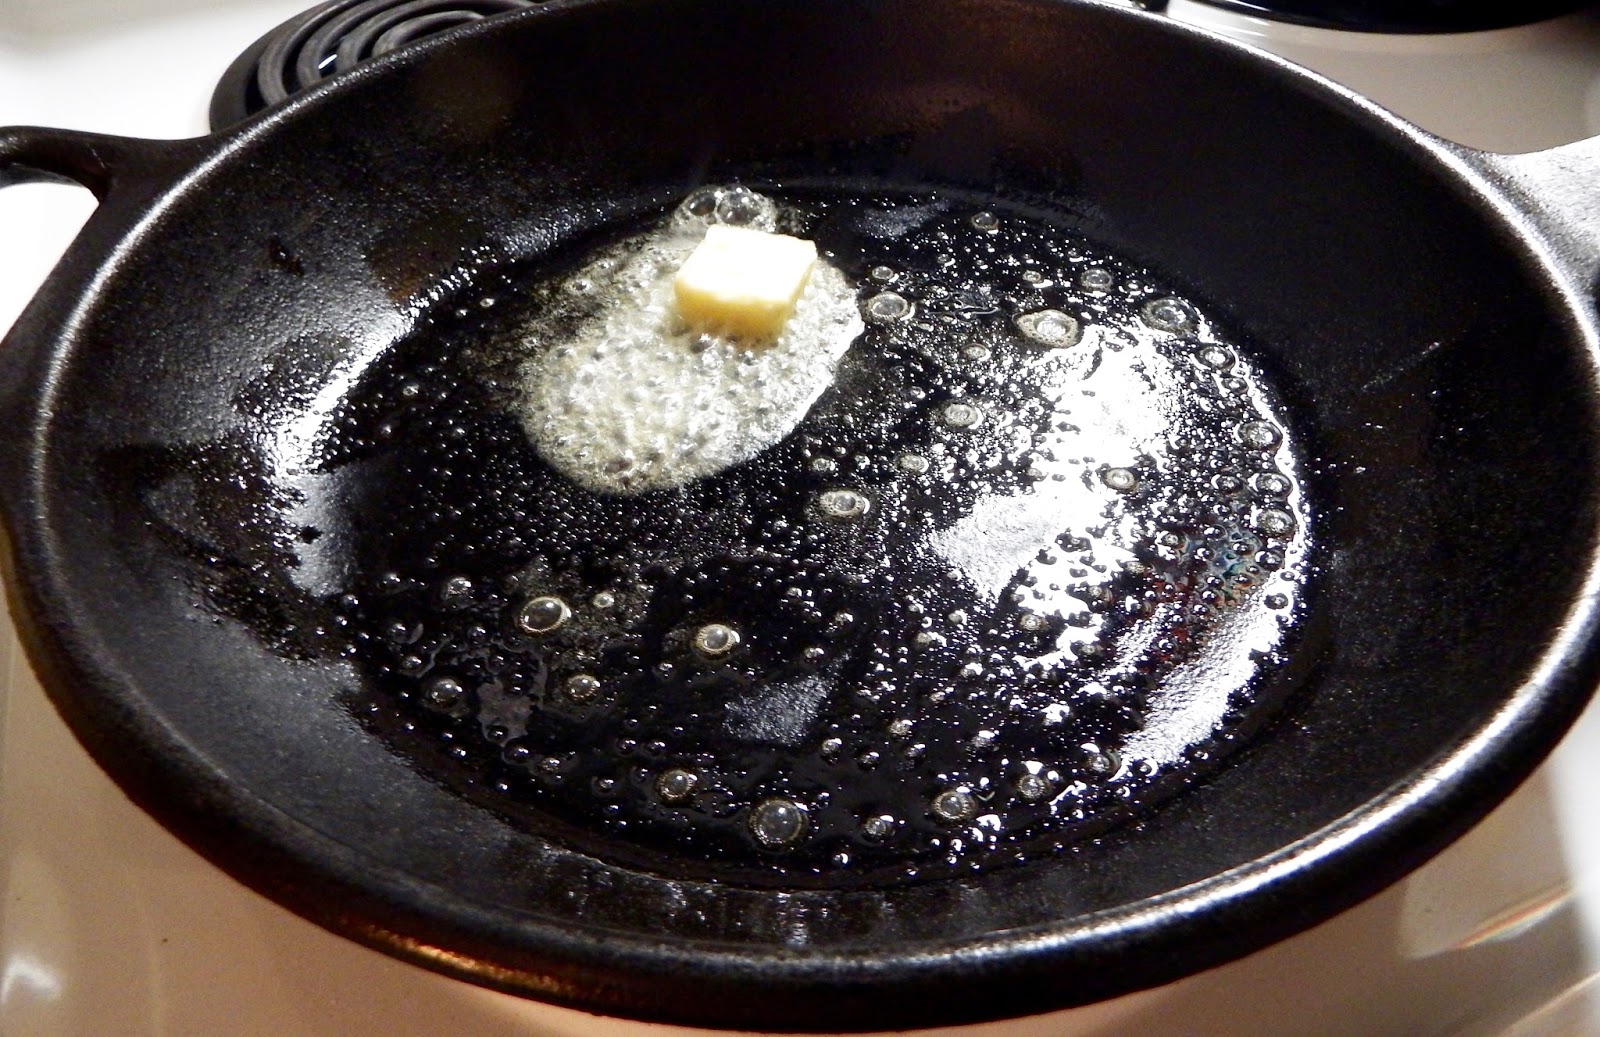
Carefully remove the hot skillet out of the oven and reduce the heat to 375 F/191 C. Add the remaining butter to the skillet and cover. Don't forget to grease the sides as well.
Pour the cornbread batter into the skillet. It should sizzle right away and the butter should bubble up the sides. Smooth out the top a bit with spatula, but don't fuss about making it perfect.
Place in the middle of your preheated oven and bake for 25 minutes or until it's golden and an inserted toothpick comes out clean.
Carefully invert onto a wire rack to cool. I mean seriously though. Can we talk about this amazing, golden brown crust?
That's it! Pretty forgiving right? It got great reviews at the pot luck. Simple but satisfying. It's not very spicy but has a pleasant, mild heat. Feel free to add as much or as little jalapeño/cayenne as you like. The sweetness from the sugar and the corn with the richness from the butter and eggs make a well-rounded flavour profile. If you like, you can even add a tbsp of Dijon mustard to your batter and that will help to bring out the cheddar flavour. Cornbread is best when it's a little warm but it's nice at room temperature. Try to eat it up within a day. For this reason I find it's good for families or groups. In a pinch you can always freeze any unused portions. It will keep well for 2-3 months. If you're celebrating Christmas and making a turkey you could use it as stuffing. lol

I hope you give this a try. Leave me a comment to let me know how it turns out or post a picture of it on your Twitter or Instagram and tag me @FoodByBram so I can see! I'd love to see all your cornbreads. This recipe is pretty foolproof. I believe in you. ;)
Til Next Time!
B
Hi everybody! My apologies for the lack of material lately. It's been months since my last post. I didn't end up doing a Thanksgiving post this year. Truth be told, this year we tried a dry-brine method for our Thanksgiving turkey but while it was still tasty, it didn't quite do what we thought it would. We're going to try a similar method on our Christmas turkey. Once we have it all ironed out I will be sure to share it on the blog.
Although some annual traditions on the blog have been broken this year, this one has persevered: The Hanukkah recipe. Every year I do a Hanukkah recipe and a Christmas recipe. This year Hanukkah begins at sundown on December 24th. Many Jewish families will be preparing brisket during that time. Brisket is a popular Jewish holiday meal for a few reasons. Throughout history it has been an inexpensive cut of meat. Due to its size and need for lengthy cooking it's not convenient for every day preparation, therefore making it fit for a special occasion. Brisket also comes from the breast area of the cow and traditionally Jews abstain from eating meat from the hind quarters of cows, making it kosher.
Brisket is a tough cut of meat. Full of fat and connective tissue. All cuts of meat like this need to be cooked low and slow. High temperatures and quick cooking times won't be enough to render the meat. Good brisket isn't just tender - it melts in your mouth. Brisket is either slow roasted, braised in liquid or cooked for hours in a smoker. They are all delicious, but for me, nothing beats a good Texas-style smoked brisket. Done properly it's better than any steak you can get. The meat absorbs that beautiful smoky flavour over the course of hours but still maintains that beautiful, rare pink colour and it's so juicy. There are only two reasons why I'm not doing a smoked brisket recipe and they are as follows: I don't have a smoker and even if I did I live in Canada and it's December. That being said, this slow roasted method is still an incredible way to have brisket. It's fantastic with potatoes and veggies, but what brisket is also famous for is sandwiches.
I used the brisket in this demonstration specifically for sandwiches for the work week. It was so good! I hardly needed a whole brisket however. A full cut of brisket has a fat end and a tapered end. The fat end is called the point and then tapered end is called the flat. I only used the flat cut for this recipe.
Since I'm such a big fan of the Texas smoked brisket version, we're going to use some southern BBQ flavour from spices and add them to the meat. Cumin, smoked paprika, pepper and brown sugar all bring that sort of vibe. As a personal preference, I generally don't include salt or pepper to spice mixes. So season to your taste in that regard. After all, this is just a guideline. Feel free to tweak it or use another spice mix of your liking.
A final note, this recipe calls for fresh rosemary. The flavour is amazing and works really well in this dish. Unfortunately the market was out of rosemary when I was gathering my ingredients for this demo. So while it is absent in the photos, I encourage you to use it. If not, no worries. Fortunately this brisket turned out just fine without it.
Ingredients
Spice Rub:
Ground cumin 1 tbsp
Smoked paprika 1 tbsp
Chili powder 1 tbsp
Ground mustard 2 tsp
Cayenne pepper 2 tsp (optional, or to taste)
Garlic powder 1 tsp
Onion powder 1 tsp
Nutmeg, freshly ground 1/2 tsp
3-4 lb piece of brisket
1 onion, coarsely chopped,
2 carrots, coarsely chopped,
2 ribs of celery, coarsely chopped
1 bulb garlic, halved horizontally (don't bother removing the skins)
1 stalk of fresh rosemary
5 bay leaves
1 tbsp brown sugar
Salt and pepper, to taste
1-2 tbsp of olive oil, for marinating
2 tbsp of neutral oil (like vegetable or canola), for frying
Here is the brisket flat that I had to work with. It was about 3.2 lbs. Here is one side, which you can see has quite a bit of fat on it:
The other side is quite fatty as well. Unless your cut has much more fat than what you see here, do not trim any of it off. It will add flavour to the meat as it cooks, prevent it from drying out and much of it will melt away completely. What ever fat might not can easily be removed when it's finished cooking. If you prefer to keep it on even after cooking, knock yourself out. But it is crucial that the fat stays on during the cooking process.
Preheat oven to 275 F/135 C. First step is to combine all of the spices for your rub.
Slather the brisket in 1-2 tbsp of olive oil until it is lightly coated all over. Season to taste with salt and pepper. I encourage you to be generous with both as this is a big piece of meat. Then, use your hands to rub the spices all over. Really get your fingers in there. There is no tool better for this job than your own clean, bare hands.
Then seal in a plastic bag and leave it in the fridge to marinate overnight. In a pinch you could get away with a couple of hours, but overnight is preferred.
Remove the brisket from the fridge and let it sit for an hour or two until it comes back up to room temperature. Warm a large pot or dutch oven (cast iron is perfect) over medium-high heat and add 2 tbsp of a neutral oil (like canola or vegetable). Olive oil is not a good alternative as it has too low a smoking point for this job. Then sear the brisket on each side for 3-4 minutes and 1-2 for the sides. You want a nice sear all over the meat. This seals in the spices, develops flavour and creates a nice crust.
Remove the brisket and add the onion to the pot. Add a pinch of salt and a tbsp of brown sugar. The salt will help to sweat the onions and the brown sugar will help to caramelize them. They will also pick up flavours from the spices and the fond of the beef in this step. Cook for about 4 minutes.
Add the carrots and celery and cook for an additional 3 minutes or so. Add the garlic, rosemary and bay leaves and continue to sautée for an additional 4-5 minutes. Season to taste with salt and pepper.
Place the brisket on top of the aromatic veggies, fattiest side up. Then place a tight fitting lid on your pot and place it in the middle of your preheated oven. If you don't have a lid you can improvise with metal foil. The idea is just to keep the steam inside the pot so it doesn't dry out. Let the brisket roast undisturbed for 4 hours.
Here's what the brisket looks like after about 4 hours. It will have shrunken through the process of all the fat and connective tissue melting away. The bed of veggies will be saturated in all that grease. Their job of perfuming the meat are done and can be discarded (although if you have some crusty bread lying around you may want to treat yourself to a dip or two of that liquid).
Remove the brisket and wrap it in metal foil. Leave it to rest for an additional 30-45 minutes. Do not skip this step as it is crucial in retaining all of the meat's juices. You have come so far, but just a little more patience is required. The rewards are well worth it.
After the resting process has completed, remove from the foil and slice her up!
It's very important to slice against the grain of the meat, otherwise it will all fall apart on you. So you want to cut the brisket in the opposite direction which the fibres of the meat are running. You can slice is thick or thin as you want but I find the thickness of about a pencil works best. The sign of a properly executed brisket is that with very little effort the natural fibres of the meat will kinda separate, opening little holes and cracks in the meat like so...

Yum! Yum! Yum! The low and slow technique leaves the meat so tender, juicy and melt-in-your-mouth. The fat cap that was left on the top side fell right off so it was very easily removed and discarded. After cooking it's job is technically done. I shared some with my neighbours and used the rest to make the most incredible sandwiches at the office. Since brisket is so tender it doesn't need many condiments. Plain ol' mustard is good enough. I added a slice of cheddar and some dill pickle as well. By adding cheese I think it's no longer kosher, so forgive my impartiality. It was so good! lol
You guys have gotta try this! It's very easy and inexpensive if you measure it in how many meals you get out of a flat cut. The hardest part of this whole process is just the patience. It will make you home smell so good as it cooks too. Brisket makes not just a great Hanukkah feast, but a nice Sunday roast dinner. Especially with these colder nights approaching. So cozy and comforting.
I love brisket with mustard. It's the most popular condiment with it. I once watched a video online of Gordon Ramsay preparing a slow roasted brisket and he mentioned how he likes his with piccalilli. I've never tried it but I bet it would be good. If you're not familiar, piccalilli is an English relish of tangy pickled veggies and spices. It usually has mustard in it anyway. lol
I hope you enjoy your home cooked brisket. Good luck! To all my Jewish readers, I wish you and your families all a very happy Hanukkah this year.
B